A new model is made – part 3

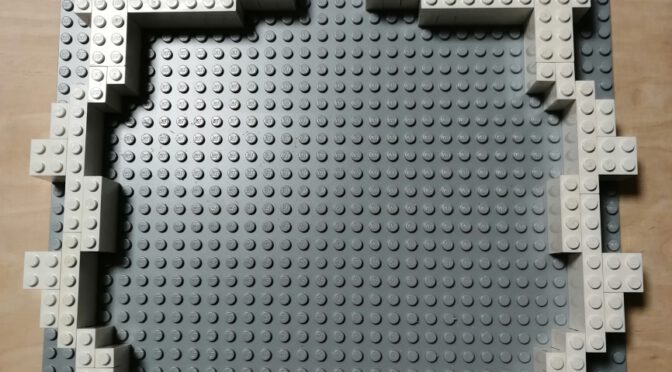
Last time I built the first “foundation walls. ” Today I would like to report on the further construction of the wall with the corresponding openings, corners and niches.

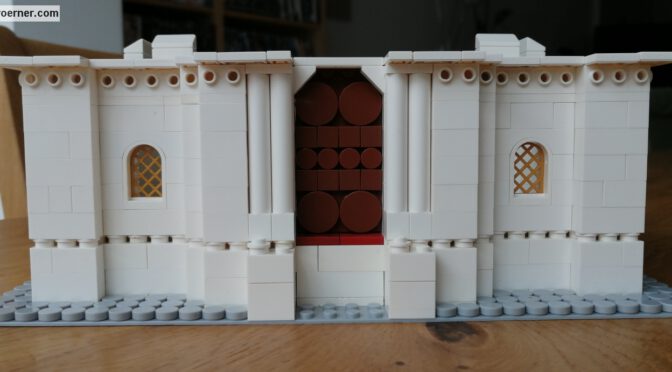
After the initial considerations regarding the basic form were implemented in the first construction phase, care must now be taken to maintain the individual heights. The principle is the same as for the width of the building. I put the horizontal steps and heights of the windows, cornices and individual floors together in proportion to the width that already existed. Here it is important to take the same measurements, otherwise the height will not be correct later and the building will be too low or too high. In height the realization is a bit easier, because Plates have a height of 3.2mm and therefore only take up a third of his Brick.

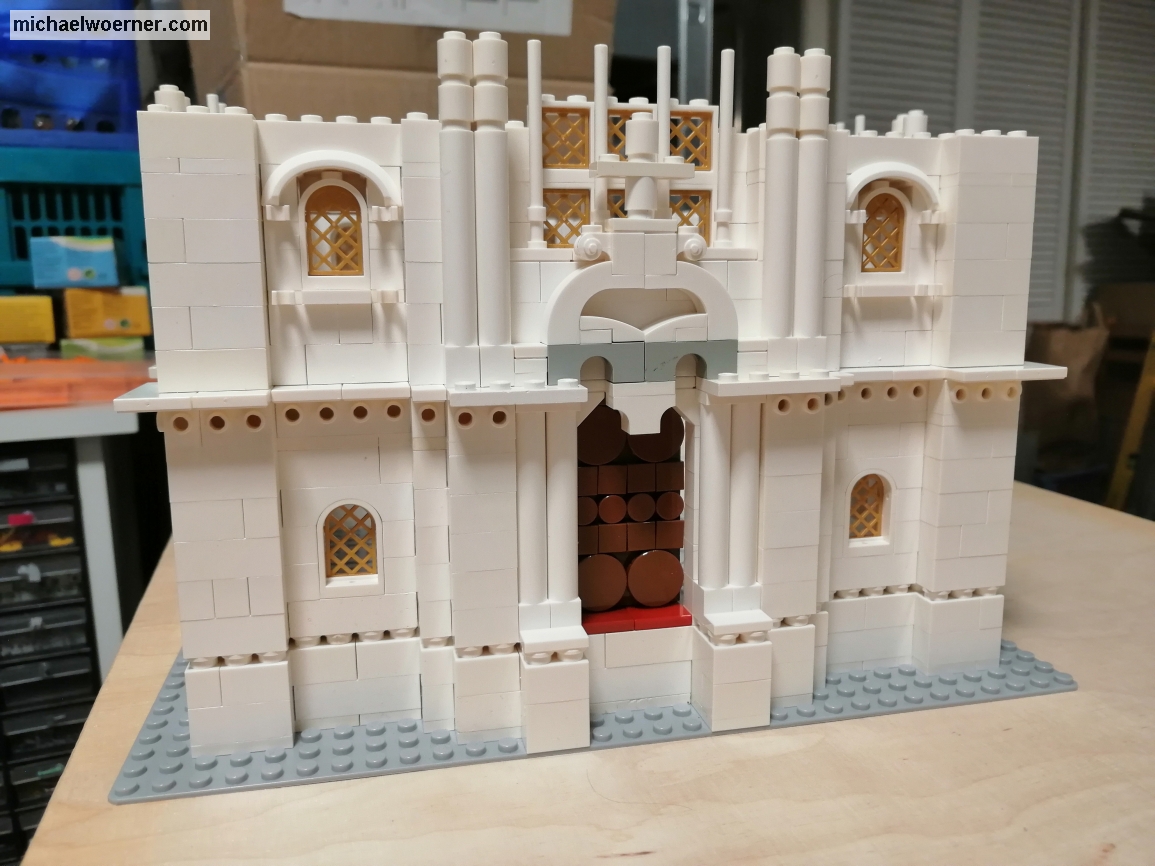
I had already considered using ready-made window elements in the last part. The choice was 2 pins wide, 3 rows high, semi-circular windows (30044) with grilles (30046). Unfortunately, the color selection is very limited with Lego® and with grids in particular. I decided to go with the gold because the contrast with black compared to the white walls, would be way too stark. When installing, I had to decide whether to use jumperplates (15573) to move the windows back half a brick.It looks more and more pleasing, and if you look at reality, it is very often the case. Unfortunately, I would have caught a problem 3 rows further. The windows have an arch at the top and a pin in the middle. The standard arches framing the windows at the top would not fit because of this pins. Fortunately, the grilles are not mounted in the middle of the window, but on one side. Thus there is the possibility to set the grid inside, and thus offset back, or outside flush. I decided to go inside.

The next step are the columns. My building has obstructed columns. Unfortunately, in at least 3 different thicknesses. At my scale, a wider column than 1 pin is not feasible, or the part will be too wide and I won’t be able to keep my scale. That means compromise again. But we Lego model builders are used to that. I decide to use the 1x1x6 rods (43888).

The next hurdle is the transition to the next floor. There’s a ledge all around here. Of course only a few cm wide in reality. For my model this means only 1-2mm. This modified plate (32028) comes directly to my mind. But you can’t because there are no inside or outside corners. That wouldn’t look good. The same applies to the jumper plates. So slabs or tiles? With Plates I have the pins standing, I don’t like that. Tiles do not have these and so they are my choice. At the same time, they also allow to build the model Modular. To create a separation point for better transportation.


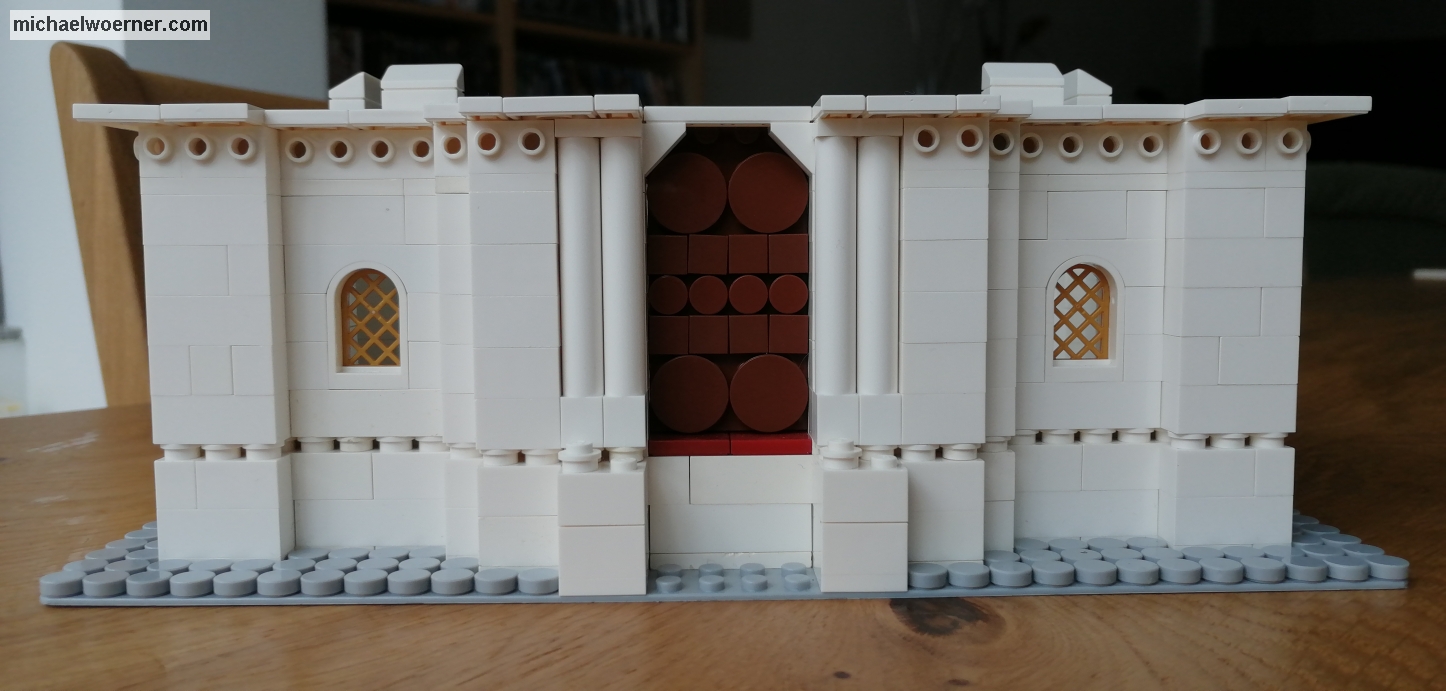
The second floor is almost identical to the first. But the windows have much more ornaments and a column frame all around. with the little space that the scale allows me to implement a tricky thing. I have re-entitled the side columns with 3 bars (87 994) and the upper arch with a mudguard (98282) and am satisfied with the result. The arches in the middle are next. I tried to recreate it with different elements, but it’s not that filigree with Lego. Nevertheless, you can see what it is meant to represent. The columns in front of the windows behind them are realized by rods (63 965) and cut tubes (75c24).

The picture still shows parts that need to be replaced. I either don’t have the part there or it’s in the wrong color. In order to move forward, I therefore use these and can continue building like this.

That’s it for today, until the next post.

a new model is made – part 2

Now is the time. As announced, the second Part of the construction of the model.

Let’s start with the ‘what’. I don’t want to give too much away yet. It’s not difficult either and you’ll figure out what it’s going to be pretty quickly. But this much in advance: it will be a building that really exists.
I chose a 32×32 pin baseplate as my measurement. In the run-up I made many photos of the object and informed myself about the real dimensions, searched in the internet resp. determined from photographs. One edge length has about 17 meters. The building has a square footprint, which makes it quite easy to get the model onto a 32 baseplate. Each Lego® brick has a width of 8mm per pin, so a 32 baseplate is 32 x 0,8cm = 25,6cm wide/long.

Watch out, here comes math!!!
Scale = 1 : scale number
Scale number = true size : model size

For me, this means that I have a scale of 1:70 at 17,5m side length. Thus 70cm in real complies 1cm model. You can work with that. Now I take a picture where the building is completely visible from the side and I separate it into the distinctive areas, bounded by corners, projections, windows and stairs. I measure the distances and put them in relation to my available width. It almost never fits precisely because of the 8mm grid. But a little adaptation and consideration (how wide is a finished window?) then give me the solution. I decided to use finished window elements and not build them myself out of parts. The scale allows this and reduces the complexity and the total number of parts and thus the price.

For ease of understanding, I have given numbers in brackets after the parts described. These are the design numbers of Lego.

I have a bird’s eye view picture with another from the side, and I’m using those to lay the first layers of bricks. The rounding on the back is a little tricky and it took me some tries to get it to work that way. The angles do not allow the bricks to be fixed to the base plate, the hinges give a lot of movement. To counteract this, I used angles (99207 + 32952) with tiles on the base plate to keep the distance to the wall as small as possible and the curve evenly in shape. I use 2 different hinges for the rounding. One as a stone (3830c01), the other as a plate (2429c01). A comparison with the picture from the side shows me that this could fit. I’ll keep building, if it doesn’t fit later I can change it. I love plug-in systems 😉

That’s it for today. Until the next part, then with more pictures

a new model is made

In the next few days, I will publish a kind of diary here at this point. It’s about how a new model of me comes into being and what problems I’ve encountered in the process. Using pictures and descriptions, I show what I tried and how I finally built. With this diary I accompany the construction of the model from the first step to the completion. You have a chance to guess what it should be. The dissolution, if you don’t know it already, comes to an end.

Have fun

Wir benutzen Cookies nur für statistische Zwecke. View more
Cookies settings
Accept
Privacy & Cookie policy
Privacy & Cookies policy
Cookie name Active
Geltungsbereich Diese Datenschutzerklärung soll die Nutzer dieser Website gemäß Bundesdatenschutzgesetz und Telemediengesetz über die Art, den Umfang und den Zweck der Erhebung und Verwendung personenbezogener Daten durch den Websitebetreiber [Michael Wörner] informieren. Der Websitebetreiber nimmt Ihren Datenschutz sehr ernst und behandelt Ihre personenbezogenen Daten vertraulich und entsprechend der gesetzlichen Vorschriften. Bedenken Sie, dass die Datenübertragung im Internet grundsätzlich mit Sicherheitslücken bedacht sein kann. Ein vollumfänglicher Schutz vor dem Zugriff durch Fremde ist nicht realisierbar.

Zugriffsdaten

Der Websitebetreiber bzw. Seitenprovider erhebt Daten über Zugriffe auf die Seite und speichert diese als „Server-Logfiles“ ab. Folgende Daten werden so protokolliert:
  • Besuchte Website
  • Uhrzeit zum Zeitpunkt des Zugriffes
  • Menge der gesendeten Daten in Byte
  • Quelle/Verweis, von welchem Sie auf die Seite gelangten
  • Verwendeter Browser
  • Verwendetes Betriebssystem
  • Verwendete IP-Adresse
Die erhobenen Daten dienen lediglich statistischen Auswertungen und zur Verbesserung der Website. Der Websitebetreiber behält sich allerdings vor, die Server-Logfiles nachträglich zu überprüfen, sollten konkrete Anhaltspunkte auf eine rechtswidrige Nutzung hinweisen.

Cookies

Diese Website verwendet Cookies. Dabei handelt es sich um kleine Textdateien, welche auf Ihrem Endgerät gespeichert werden. Ihr Browser greift auf diese Dateien zu. Durch den Einsatz von Cookies erhöht sich die Benutzerfreundlichkeit und Sicherheit dieser Website. Gängige Browser bieten die Einstellungsoption, Cookies nicht zuzulassen. Hinweis: Es ist nicht gewährleistet, dass Sie auf alle Funktionen dieser Website ohne Einschränkungen zugreifen können, wenn Sie entsprechende Einstellungen vornehmen.

Umgang mit personenbezogenen Daten

Der Websitebetreiber erhebt, nutzt und gibt Ihre personenbezogenen Daten nur dann weiter, wenn dies im gesetzlichen Rahmen erlaubt ist oder Sie in die Datenerhebung einwilligen. Als personenbezogene Daten gelten sämtliche Informationen, welche dazu dienen, Ihre Person zu bestimmen und welche zu Ihnen zurückverfolgt werden können – also beispielsweise Ihr Name, Ihre E-Mail-Adresse und Telefonnummer.

Umgang mit Kontaktdaten

Nehmen Sie mit dem Websitebetreiber durch die angebotenen Kontaktmöglichkeiten Verbindung auf, werden Ihre Angaben gespeichert, damit auf diese zur Bearbeitung und Beantwortung Ihrer Anfrage zurückgegriffen werden kann. Ohne Ihre Einwilligung werden diese Daten nicht an Dritte weitergegeben.

Umgang mit Kommentaren und Beiträgen

Hinterlassen Sie auf dieser Website einen Beitrag oder Kommentar, wird Ihre IP-Adresse gespeichert. Dies dient der Sicherheit des Websitebetreibers: Verstößt Ihr Text gegen das Recht, möchte er Ihre Identität nachverfolgen können.

Rechte des Nutzers: Auskunft, Berichtigung und Löschung

Sie als Nutzer erhalten auf Antrag Ihrerseits kostenlose Auskunft darüber, welche personenbezogenen Daten über Sie gespeichert wurden. Sofern Ihr Wunsch nicht mit einer gesetzlichen Pflicht zur Aufbewahrung von Daten (z. B. Vorratsdatenspeicherung) kollidiert, haben Sie ein Anrecht auf Berichtigung falscher Daten und auf die Sperrung oder Löschung Ihrer personenbezogenen Daten.  
Save settings
Cookies settings